Article Content
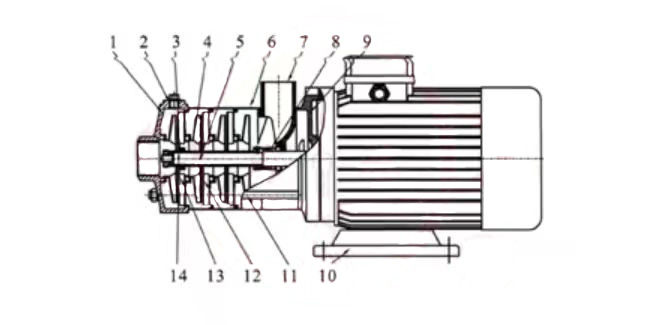
BZ Self-Priming Centrifugal Pump
Complete Installation Guide
⚠️ Safety Notice
Before installation, ensure power is disconnected and all safety protocols are followed.
1. Pre-Installation Preparation
1.1 Site Requirements
- Foundation must be level, stable, and vibration-free
- Ambient temperature ≤ 40°C
- Adequate ventilation for motor cooling
- Sufficient space for maintenance access (minimum 1m around pump)
1.2 Tools Required
- Leveling instrument
- Torque wrench
- Alignment tools
- Lifting equipment (for pumps >50kg)
- Sealant and gaskets
2. Foundation Installation
2.1 Base Plate Mounting
- Prepare concrete foundation with minimum 150mm thickness
- Install anchor bolts according to base dimensions
- Place base plate and level using precision level (tolerance: 0.1mm/m)
- Grout base plate with non-shrink grout
- Allow 48 hours curing time before pump installation
3. Pump Installation
3.1 Positioning
- Use lifting equipment to position pump on base
- Align pump centerline with foundation marks
- Install vibration isolation pads if required
- Tighten mounting bolts to specified torque (refer to manual)
3.2 Motor-Pump Alignment
| Alignment Type | Tolerance | Method |
|---|---|---|
| Parallel Misalignment | ≤ 0.05mm | Dial indicator |
| Angular Misalignment | ≤ 0.05mm/m | Feeler gauge |
4. Piping Connection
4.1 Suction Piping
- Keep suction pipe as short as possible (max 5m recommended)
- Pipe diameter ≥ pump inlet diameter
- Install eccentric reducer (flat top) to prevent air pockets
- Ensure airtight connections (use thread sealant)
- Install foot valve for suction lift applications
4.2 Discharge Piping
- Install check valve to prevent backflow
- Install gate valve for flow control
- Install pressure gauge near pump outlet
- Support pipes independently (do not transfer weight to pump)
5. Electrical Connection
5.1 Motor Wiring
- Verify voltage matches motor nameplate (380V/50Hz standard)
- Use appropriate cable size per motor power
- Install overload protection and short-circuit protection
- Ensure proper grounding (ground resistance ≤ 4Ω)
- Check rotation direction (clockwise from motor end)
6. Pre-Start Checklist
| Item | Check | Status |
|---|---|---|
| Foundation bolts | Tightened to torque | ☐ |
| Alignment | Within tolerance | ☐ |
| Bearing lubrication | Grease applied | ☐ |
| Priming water | 2/3 chamber filled | ☐ |
| Rotation direction | Clockwise | ☐ |
| Valve positions | Suction open, discharge partially open | ☐ |
7. Commissioning
7.1 First Start Procedure
- Fill pump chamber with clean water (2/3 volume)
- Open suction valve completely
- Open discharge valve 1/4 position
- Start motor and check rotation
- Gradually open discharge valve to desired flow
- Monitor current, vibration, and noise
- Check for leaks at seals and connections
7.2 Running Parameters
| Parameter | Normal Range | Action if Abnormal |
|---|---|---|
| Bearing Temperature | < 80°C | Stop and check lubrication |
| Vibration | < 4.5 mm/s | Check alignment |
| Noise Level | < 75 dB | Check for cavitation |
| Motor Current | ≤ Rated current | Check load condition |
8. Common Installation Mistakes
- ❌ Insufficient foundation stability → Causes vibration
- ❌ Poor alignment → Reduces bearing life
- ❌ Air leaks in suction line → Prevents priming
- ❌ Unsupported piping → Stresses pump casing
- ❌ Incorrect rotation → Damages impeller
9. Documentation
Keep records of:
- Installation date and technician
- Alignment measurements
- Commissioning parameters
- Initial vibration baseline
10. Contact Support
For technical assistance: Shanghai Chaodun Machinery Manufacturing Group Co., Ltd.
Website: https://cd-pump.com